Dell Vostro 3590 (P75F/P75F010) Battery WDX0R Replacement: From Symptoms to Success
This guide walks you—step by step—from noticing battery problems, to confirming them, to replacing the battery yourself. It’s written for Dell Vostro 3590 / P75F / P75F010 models and includes a live checklist and jump-to steps.
Recommended replacement:
Buy Dell WDX0R 42Wh Battery
Fits Vostro 3590
Summary
- Common Battery Issues You Should Check
- Interactive Battery Diagnosis & Replace-Now Indicator
- Before You Start: Tools, Safety, Data
- Remove microSD Card (Optional but Recommended)
- Remove Optical Drive
- Remove Base Cover
- Remove & Replace Battery (WDX0R 42Wh)
- Reassembly & Post-Replacement Checks
- FAQ & Optimization Tips
1) Common Battery Issues (How to Know It’s Time)
High-Confidence Signs
- Sudden Shutdowns at 10–40%: the laptop powers off without warning even though charge remains.
- Severely Reduced Runtime: drops from 4–6 hours (typical light use) to under 60–90 minutes.
- Battery Swelling/Bulge: touchpad lifting or base wobble—stop using and replace immediately.
- “Battery not detected” / “Your battery has experienced permanent failure” messages in BIOS or SupportAssist.
- Rapid Percentage Swing: e.g., 72% → 35% in minutes; erratic charging.
Diagnostic Evidence
- Windows Battery Report:
powercfg /batteryreportshows Full Charge Capacity ≪ Design Capacity (e.g., <70%). - High Cycle Count: hundreds of cycles with large wear (wear level >30–40%).
- AC Dependence: instantly shuts down when AC adapter is unplugged.
- Thermal Throttling While on Battery: system slows drastically on battery only.
Safety first: If you suspect swelling, do not continue charging or disassembly without proper precautions. Replace the battery promptly.
2) Battery Health Quick-Check (Interactive)
Is It Time to Replace Your Battery?
Tick what you’re experiencing. If 2 or more items apply, we recommend replacement.
Checked: 0 / 6
3) Before You Start: Tools, Safety, and Data
Tools & Parts
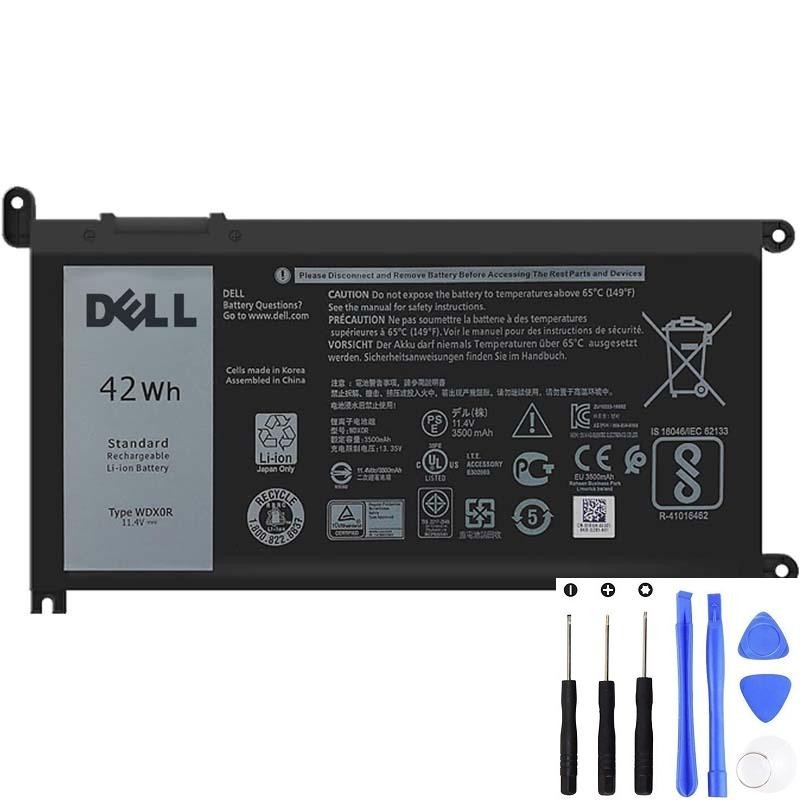
- Replacement Battery: Dell WDX0R 42Wh (for Vostro 3590) —
product page. - Small Phillips screwdrivers: PH0/PH1
- Plastic spudger / pry tool
- Anti-static precautions (ESD strap or frequent grounding)
Screw Map (keep track as you go)
| Section | Size | Count | Notes |
|---|---|---|---|
| Optical drive | M2×4 | 1 | Secures the drive to chassis |
| Base cover (captive) | — | 3 | Loosen only, do not remove |
| Base cover | M2×4 | 1 | Single screw |
| Base cover | M2×2 | 2 | Short screws |
| Base cover | M2.5×7 | 6 | Longer perimeter screws |
| Battery | M2×3 | 4 | Secures battery pack |
Power Down & Data
- Back up important files.
- Shut down Windows completely. Unplug AC adapter and all accessories.
- Hold power button 15 seconds after shutdown to discharge residual power.
4) Removing the microSD Card (If Inserted)
- Push the microSD card in to release it.
- Slide it out and set aside safely.
5) Removing the Optical Drive Assembly
- Remove the single M2×4 screw securing the optical drive to the system.
- Slide the optical drive straight out of the chassis.
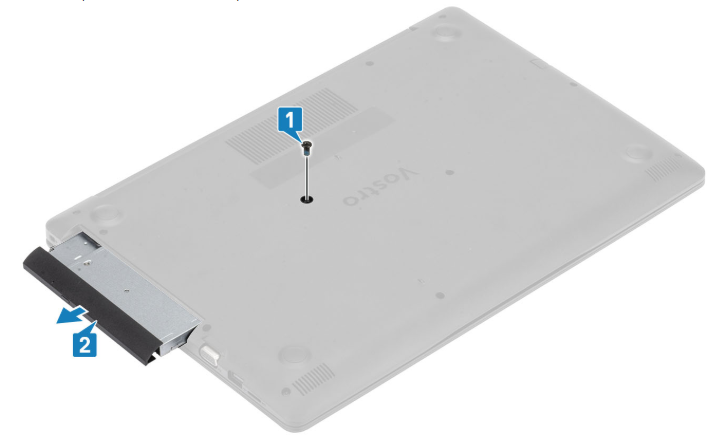
6) Removing the Base Cover
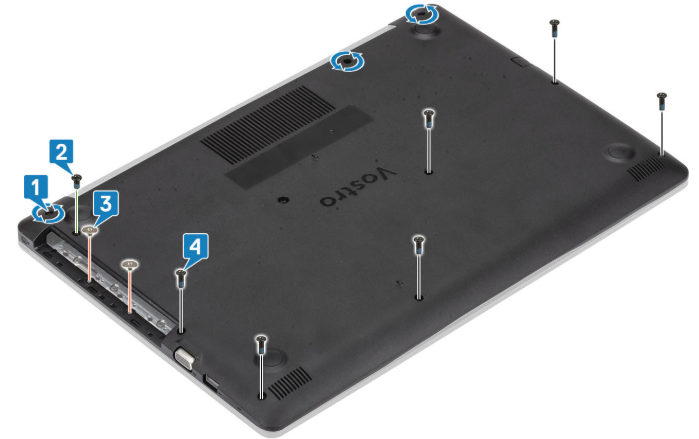
- Loosen the three captive screws (they stay attached to the cover).
- Remove:
- one M2×4 screw,
- two M2×2 screws,
- six M2.5×7 screws.
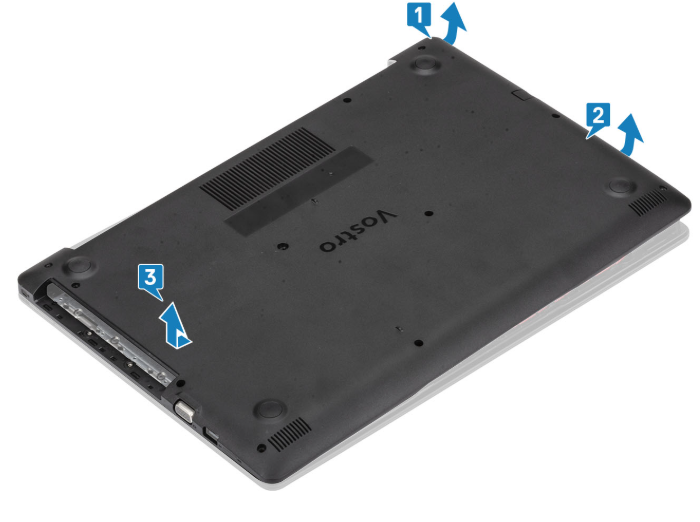
- Starting at the top-right corner, gently pry the base cover seam with a plastic tool and continue along the right edge.
- Lift the left side of the base cover and remove it.
7) Removing & Replacing the Battery (WDX0R 42Wh)
Removal
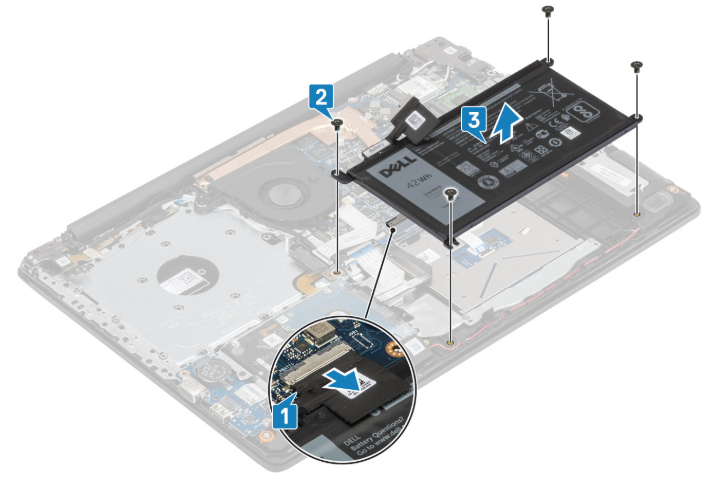
- Disconnect the battery cable from the system board—lift the connector evenly by the plug, not by the wires.
- Remove the four M2×3 screws securing the battery.
- Lift the battery out carefully.
Installation
- Place the new WDX0R 42Wh battery into position.
- Install the four M2×3 screws (do not overtighten).
- Reconnect the battery cable, ensuring it seats fully and evenly.
Pro Tip: If any adhesive tabs are present, peel slowly and keep adhesive flat to avoid bending the pack.
Purchase the WDX0R 42Wh Battery
8) Reassembly & Post-Replacement Checks
Reassembly (reverse order)
- Re-fit the base cover; press along edges to snap clips; install screws (use the screw map).
- Slide in the optical drive; install the M2×4 screw.
- Reinsert the microSD card if used.
First Power-On & Battery Calibration
- Connect AC and power on. If prompted, reset BIOS date/time and confirm battery is detected.
- In Windows, let the battery charge to 100%, then keep charging for an extra 30 minutes.
- Unplug and discharge to ~10–15% with normal use, then recharge to 100%. Repeat once to stabilize reporting.
- Generate a battery report: open Command Prompt (Admin) → run
powercfg /batteryreportand review capacity.
After replacement, typical light-use runtime should feel consistent. Minor percentage “jumps” may occur during the first 1–2 cycles.
9) FAQ & Optimization
Will any WDX0R work?
Use a reputable WDX0R 42Wh pack designed for Dell Vostro 3590. The linked product above matches the required form factor, voltage, and connector.
My laptop still shuts off early after replacement.
Run two full charge/discharge calibrations, update BIOS and power drivers, and verify the AC adapter wattage is correct. If the issue persists, review thermal health or system board power rails.
How can I extend new battery lifespan?
- Keep temps cool; avoid blocking vents.
- Avoid 0% and 100% extremes daily—40–80% is gentler for storage.
- Update BIOS/firmware for better charge control.