
Short version: If your XPS 14 9440 shows two or more battery red flags, replace it with a compatible pack such as the GT83D 70Wh. Use the checklist to decide quickly, then follow the step-by-step guide.
Summary (tap to jump)
- Common battery problems & how to tell
- Quick compatibility check (models & part numbers)
- Battery Problem Diagnosis Checklist
- Tools & preparation
- Step 1: Remove the base cover
- Step 2: Disconnect the battery cable
- Step 3: Remove the battery
- Step 4: Install the new GT83D battery
- First boot, calibration & health check
- Care & longevity tips
- FAQ
Common battery problems & how to tell
Before buying, verify the symptoms. The table below maps real issues to likely causes, quick tests, and next steps.
| Symptom | Likely cause | How to verify (2–5 min) | Action |
|---|---|---|---|
| Battery % drops fast (e.g., 35% → 5%) | Capacity fade / cell imbalance | Windows: run powercfg /batteryreport; check “Design vs. Full charge capacity” |
Replace if Full Charge < 70% of Design |
| Random shutdowns on battery | Voltage sag under load | Stress test on battery only (CPU/GPU) to reproduce | Replace; also check thermals |
| Won’t charge past ~80% | Charge threshold set (Dell Power Manager) | Set Standard/ExpressCharge; retest runtime | Replace if still short |
| Battery swelling / lifted cover | Polymer gas expansion with age | Visual inspection; uneven palm rest; wobble | Stop using; replace immediately |
| “Battery needs service” warning | High cycle count / degraded health | Dell ePSA/BIOS battery health; Windows report | Plan replacement |
| Inaccurate gauge (stuck at 1%, then dies) | Miscalibration + worn cells | Calibration: 100% → 10–15% → full | Replace if behaviour persists |
| Runs hot on battery | High internal resistance | Compare temps on battery vs. AC | Replace; keep vents clean |
Quick compatibility check (models & part numbers)
- Target laptop: Dell XPS 14 9440 (chassis codes P184G / P184G001 / P184G002)
- Battery model: GT83D, 70Wh Li-ion polymer
- Compatible part numbers (exact text): GT83D; 07T7DY / 7T7DY / CN-07T7DY; N80X2 / 0N80X2 / CN-0N80X2
Battery Problem Diagnosis Checklist
Select all that apply. If you tick two or more, it’s time to replace the battery.
Select your symptoms:
Tools & preparation
- T5 Torx screwdriver (eight M2×3 T5 screws)
- Small Phillips screwdriver (battery screws)
- Plastic pry tool or guitar pick
- ESD precautions (discharge static; optional anti-static strap)
- Clean surface and a tray for screws; back up important data
Power safety: Shut down, unplug the AC adapter, and hold the power button for 5 seconds to discharge flea power.
Step 1: Remove the base cover
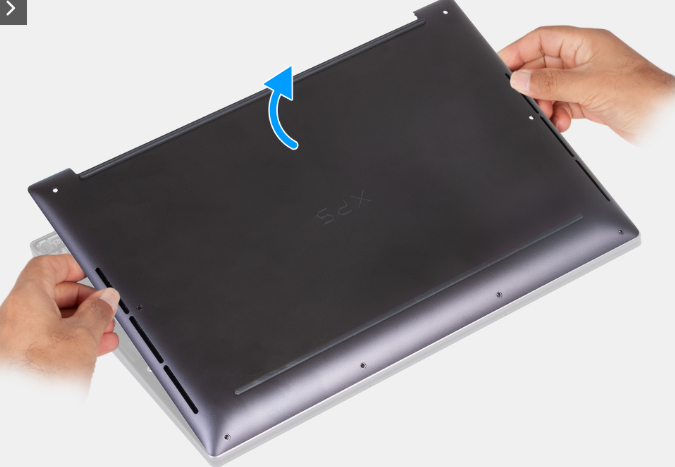
- Remove the eight screws (M2×3, Torx 5) that secure the base cover to the palm-rest assembly. Use a T5 screwdriver.
- Place your thumbs/fingers into the recess at the top edge of the base cover.
- Use both thumbs to pry the base cover to release it, then gently work along the edges.
- Lift the base cover off and set it aside.


Step 2: Disconnect the battery cable
- Loosen the captive screw that secures the battery connector bracket to the palm-rest assembly.
- Remove the battery connector bracket.
- Using the pull tab, disconnect the battery cable from the system board.
- Press and hold the power button for five seconds again to fully discharge.

Step 3: Remove the battery
Note: Removing the battery can reset BIOS settings to default. If you use custom boot or performance settings, note them before removal.
- Identify the battery pack and its mounting screws.
- Remove the battery screws in a cross pattern to avoid stress.
- Lift the battery gently from the chassis. Do not bend or puncture the pack.

Step 4: Install the new GT83D 70Wh battery
- Place the new GT83D 70Wh pack into position, aligning screw holes and cable route.
- Install the battery screws and tighten evenly.
- Reconnect the battery cable, reinstall the connector bracket, and tighten the captive screw.
- Refit the base cover: align clips, press around the perimeter, and reinstall the eight T5 screws.
First boot, calibration & health check
- Power on and enter BIOS to confirm the battery is detected and health is “Normal”.
- In Windows, open Dell Power Manager and choose a charge mode (Standard or ExpressCharge).
- Calibrate: charge to 100% → use down to ~10–15% → full charge. This re-syncs the gauge.
- Run
powercfg /batteryreportto confirm Full Charge Capacity looks healthy.
Care & longevity tips
- Keep vents clear; avoid heat build-up.
- For desk use, consider a charge cap (e.g., 80%) in Dell Power Manager.
- Avoid frequent 0% deep discharges; store long-term at ~40–60% in a cool, dry place.
FAQ
| Question | Answer |
|---|---|
| Will this fix sudden shutdowns? | Yes, if caused by worn cells or voltage sag. A new, compatible pack typically resolves it. |
| Does it support ExpressCharge? | Yes, when enabled in Dell Power Manager with a suitable adapter. |
| Do I need drivers? | No. The system firmware manages charging and reporting automatically. |
| Will runtime match original? | Runtime varies by workload and settings. A healthy 70Wh pack restores expected unplugged time. |
| Unsure about DIY? | Any competent repair centre can perform the replacement quickly. |