Models covered: XPS 13 9340, XPS 13 9345, XPS 13 9350, XPS 13 9320. Battery type: MN79H / 0MN79H, DP/N: NXRKW, J7H5M.
Quick Summary & Jump Links

Recommended Replacement: Dell XPS 13 55Wh Battery (MN79H / 0MN79H)
Direct fit for XPS 13 9340 / 9345 / 9350 / 9320. Official DP/N references: NXRKW, J7H5M. High-capacity 55Wh Li-ion.
1) What You’ll Notice When Your XPS 13 Battery Needs Replacement
- Rapid drain (e.g., drops from 40% to 15% in minutes) or random shutdowns under light loads.
- Battery Wear Level > 25–30% reported by Windows or third-party tools even after calibration.
- “Plugged in, not charging” or charge stuck at a fixed percentage despite AC power.
- Unexpected thermal throttling or performance dips when on battery only.
- Swollen battery signs: trackpad clicks unevenly, palmrest bulging, chassis gaps—stop using and replace immediately.
- LED charge light amber <10% despite recent charging (see status light table below).
- Cycle count very high (commonly > 500) or Windows battery report shows degraded full-charge capacity.
2) Battery Problem Diagnosis Checklist
Tick the issues you’re experiencing. If you check 2 or more</strong), you should replace the battery.
3) Verify with Windows Report & XPS 13 Charge-Status Light
Windows Battery Report (Quick)
- Press Win + X → Windows PowerShell (Admin).
- Run:
powercfg /batteryreport /output %USERPROFILE%\Desktop\battery-report.html - Open the report from your Desktop and compare Full charge capacity vs Design capacity.
Charge & Status Light Behavior (XPS 13 9340)
| Power Source | LED Behavior | System Power State | Battery Charge Level |
|---|---|---|---|
| AC Adapter | Off | S0 – S5 | Fully Charged |
| AC Adapter | Solid White | S0 – S5 | < Fully Charged |
| Battery | Off | S0 – S5 | 11–100% |
| Battery | Solid Amber (590±3 nm) | S0 – S5 | < 10% |
S0 (ON): computer on. S4 (Hibernate): lowest power sleep, context saved to storage. S5 (OFF): shutdown state.
4) Confirm Compatibility: The Correct Replacement for Your XPS 13
- Battery Type: MN79H / 0MN79H
- Dell DP/N (part numbers): NXRKW; J7H5M
- Capacity / Chemistry: 55Wh, Rechargeable Li-ion, 11.55V, 3-cell
- Supported Systems: XPS 13 9340, 9345, 9350, 9320
Shop the recommended replacement here: Dell XPS 13 55Wh Battery (MN79H).
5) Tools, Safety & Preparation
If your device is under warranty or you’re not comfortable working inside a laptop, consult a professional.
6) Removing the Base Cover
Note: Ensure your computer is fully shut down.
- Remove the six screws (M2×3, Torx T5) securing the base cover to the palm-rest and keyboard assembly. Use T5
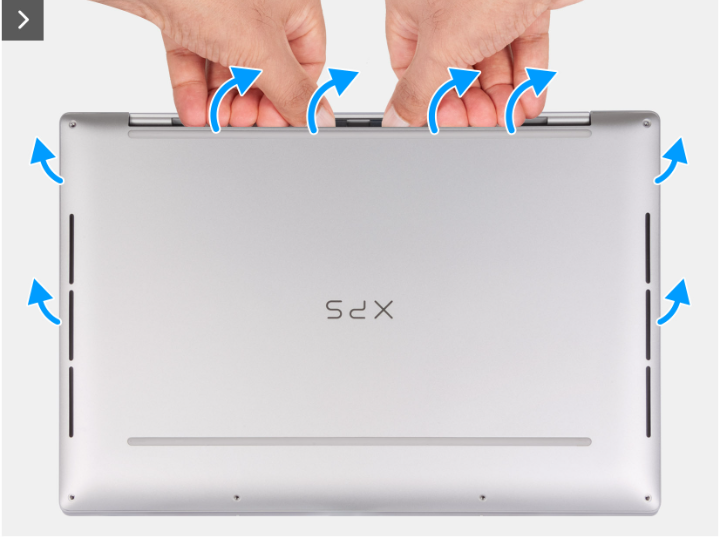
- Place your thumbs and fingers into the recess at the top edge of the base cover.
- Use both thumbs to gently pry the base cover to release it from the palm-rest and keyboard assembly.
Do not pry near the display hinges to avoid damage. - Move your hands to both sides and lift the base cover off.


7) Removing the Battery
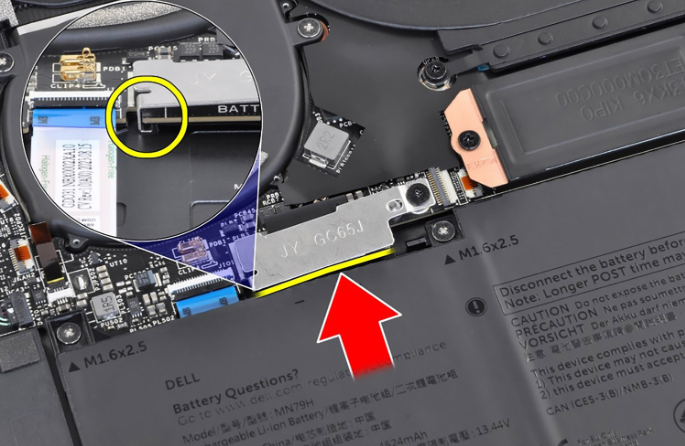
- Loosen the captive screw (M1.6×2) that secures the battery-connector bracket to the system board.
- Unhook and lift the battery-connector bracket off the board.
- Use the pull tab on the battery power cable to disconnect it from the board connector.
- Remove the six screws (M1.6×2.5) securing the battery to the palm-rest and keyboard assembly.
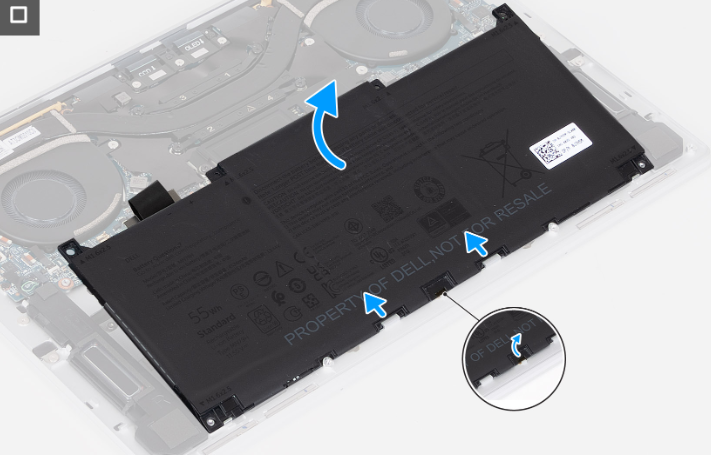
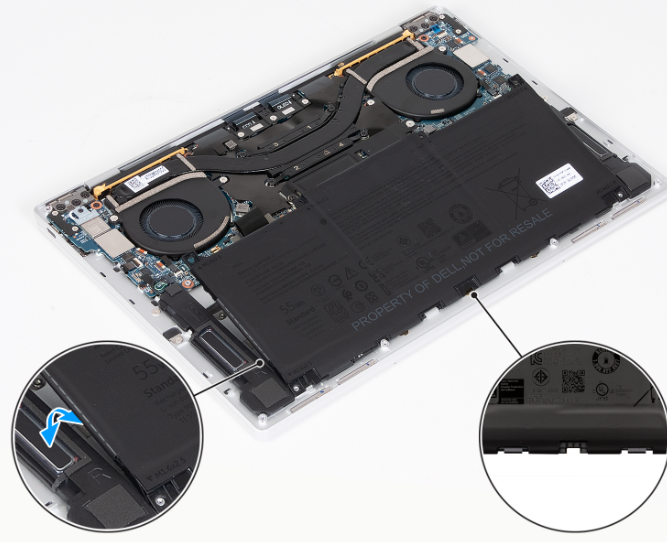
- Use the pull tab to lift the battery slightly from its top edge, releasing it from the two hooks at the bottom edge.
- Important: Do not lift the battery at more than a 30° angle to avoid damage.
- Slide the battery toward the back and lift it out.

8) Installing the New Battery (MN79H / 0MN79H)
- Align the new battery with the bottom hooks and slide it into place.
- Install the six battery screws (M1.6×2.5). Do not overtighten.
- Reconnect the battery power cable firmly and reinstall the connector bracket; tighten the captive screw (M1.6×2).
- Reinstall the base cover and secure the six T5 screws (M2×3).
- Connect AC power and perform a first boot.
9) First Boot & Battery Calibration (Best Practice)
- Charge to 100% and keep charging for an additional 30–60 minutes.
- Unplug and use the laptop down to about 10–15% without heavy loads.
- Shut down and recharge back to 100%. This helps the battery gauge learn the new pack’s capacity.
- Repeat once a month if your usage is mostly on AC.
Avoid deep discharges to 0% and extreme heat to maximize lifespan.
10) FAQ & Troubleshooting
My XPS shows “Plugged in, not charging”. Is it always the battery?
No. Check your original AC adapter and USB-C/adapter wattage, and look for bent pins or damaged cables. If the issue persists with a good adapter, the battery is a likely cause.
Do I need to enable any “Service Mode”?
No special software mode is required for the steps above. Fully power off and disconnect AC. Handle components carefully and observe ESD precautions.
After installation, Windows still reports low full-charge capacity.
Run the calibration steps. If the value remains low after several cycles, check connections and consider BIOS/driver updates. Persistent issues can indicate a defective pack—contact the seller for support.
Can I continue to use a slightly swollen battery?
No. Stop using the device, remove AC power, and replace the battery immediately to prevent damage to the trackpad and chassis.
What This Guide Covers (At a Glance)
- Dell XPS 13 models: 9340, 9345, 9350, 9320
- Battery type: MN79H / 0MN79H; DP/N: NXRKW; J7H5M
- Specs: 55Wh 11.55V 3-cell Li-ion
- Steps: base cover removal, battery disconnection, safe lift (<30°), installation, calibration
Purchase link: Dell XPS 13 MN79H / 0MN79H 55Wh