This step-by-step guide walks you from first symptoms to a safe battery replacement on the Dell XPS 13 9340 (P151G / P151G002) using the G91J0 41Wh battery.

Buy the Correct Battery
Compatible with Dell XPS 13 9340 (P151G / P151G002). Restores runtime and reliability.
Common Signs Your Battery Needs Replacement
| Symptom | Meaning | What to try first |
|---|---|---|
| Battery percentage drops fast or jumps | Cell wear or mis-calibration | One calibration cycle (100% → 10–15% → 100%) |
| Unexpected shutdown at 15–30% | High internal resistance; worn pack | Check wear data; replacement likely |
| “Plugged in, not charging” | Charge thresholds/driver/BIOS or battery fault | Reset thresholds, update BIOS, test another adapter |
| Battery not detected or X on icon | Electronics issue or loose connector | Reseat connector; replace if persistent |
| Swollen palm rest or trackpad issues | Possible swelling — stop using and replace | Power down; do not charge; replace immediately |
How to Confirm the Battery Is the Issue
- In Windows, open Command Prompt (Admin) and run
powercfg /batteryreport. Compare “Design capacity” vs “Full charge capacity”. - Do one gentle calibration cycle: 100% → ~10–15% → 100%.
- Test with a known-good adapter and clean the USB-C/charging port. If symptoms persist, replacement is the quickest fix.
Tools and Preparation
| Item | Notes |
|---|---|
| Phillips #0/#1 screwdriver | Do not overtighten; keep screws organized |
| Plastic pry tool/spudger | Avoid metal to protect finish and clips |
| ESD precautions | Ground yourself or use an ESD strap |
| Clean work surface and small tray | Prevent screw loss and keep dust away |
Before you begin: Shut down the laptop, unplug the adapter, and hold the power button for 10–15 seconds to discharge residual power. If your unit supports a service mode in BIOS, enable it before opening the chassis.
Step 1 — Remove the Base Cover

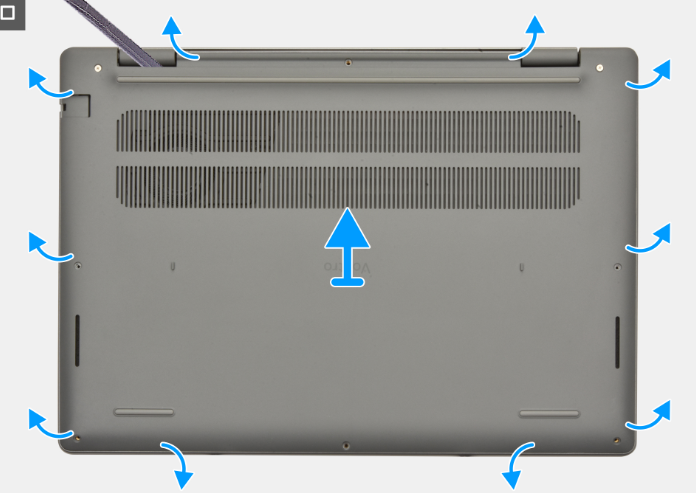
- Loosen the two captive screws and remove the six M2×4 screws securing the base cover.
- With a plastic pry tool, start at the U-shaped recesses near the hinges and gently lift the top edge.
- Continue along the left, right, then bottom edges to release all clips.
- Lift the base cover away and set it aside safely.
Step 2 — Remove and Replace the Battery
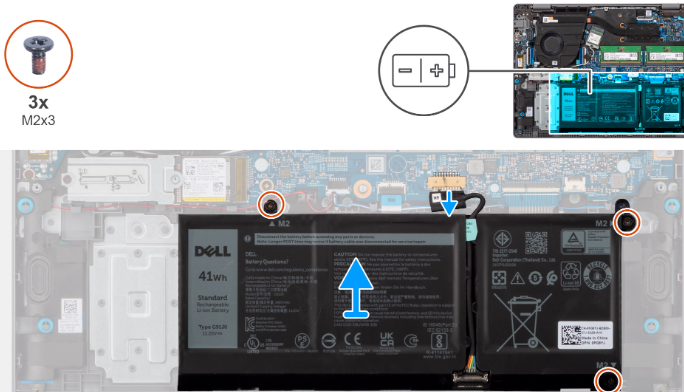
- Use the pull tab to disconnect the battery cable from the BATT1 connector on the system board.
- Remove the three M2×3 screws securing the battery.
- Lift the battery out carefully along with its cable.
- Position the new G91J0 41Wh battery, align the posts, and reinstall the three M2×3 screws.
- Reconnect the battery cable firmly to BATT1.
- Reinstall the base cover in the reverse order and tighten all screws evenly.
Post-Installation Checks
- Connect the AC adapter and power on. Confirm the battery is detected in Windows.
- Perform one calibration cycle to stabilize estimates: charge to 100% → use to ~10–15% → recharge.
- Review the new capacity in
powercfg /batteryreportand keep vents clear for best thermals.
Ready to Install?
Get the G91J0 41Wh replacement battery for your Dell XPS 13 9340 and follow the steps above.