Goal: Help you decide if you really need a new battery, verify it, and then replace it safely—step by step with photos, tables, and a smart checklist.
Summary
Already know what you need? Jump to the exact step:
1) Battery Symptoms & Diagnosis
Common Signs You Likely Need a Replacement
- Rapid drain or erratic percentage jumps (e.g., 60% → sudden shutdown).
- “Plugged in, not charging” or charging stuck at a fixed percentage.
- Battery Health/Wear is high in Dell Power Manager or Windows reports (e.g., >30–40% wear).
- Alienware performance throttles on battery (fans surge, FPS drops) even at light load.
- Unexpected sleep/shutdowns when AC is briefly disconnected.
- BIOS or SupportAssist warnings (“Battery needs replacement”).
- Physical cues: lifted touchpad/palmrest, case doesn’t sit flat, audible creaks.
- Thermal behavior changes: battery or palm rest warms abnormally during charge.
How to Verify (Quick & Reliable)
- Windows Battery Report: Open an elevated Command Prompt and run
powercfg /batteryreport. Open the generated HTML report (typically in your user folder) and check:- Design capacity vs. Full charge capacity (big gap = wear).
- Cycle count trends, recent drains, and abrupt capacity drops.
- Dell Power Manager / BIOS Battery Info: Check battery health status and remaining capacity.
- AC-only test: With battery connected, wiggle the adapter at the DC jack—if the system cuts out instantly, the pack may be failing to buffer power.
- Visual inspection: Power down, remove base cover (see below) and look for swelling or cable/sticker damage.
Battery Problem Diagnosis Checklist
Tick what you’re experiencing. If 0 selected symptoms reach 2 or more, you should plan to replace the battery.
2) Preparation, Data Safety & Tools
| Tools & Materials | Notes |
|---|---|
| Phillips screwdriver (PH0/PH00) | For M2.5×5, M2×4.5, M2×3 screws. |
| Plastic spudger / scribe | To safely release the base cover clips. |
| ESD strap (optional but recommended) | Reduces static discharge risk. |
| Small tray or screw map | Keep screws organized by step. |
| Replacement battery for Alienware M15 R2 | 6-cell Li-ion polymer, 11.40 VDC. See specs. |
3) Remove Base Cover
Goal: Access the battery and internal components.
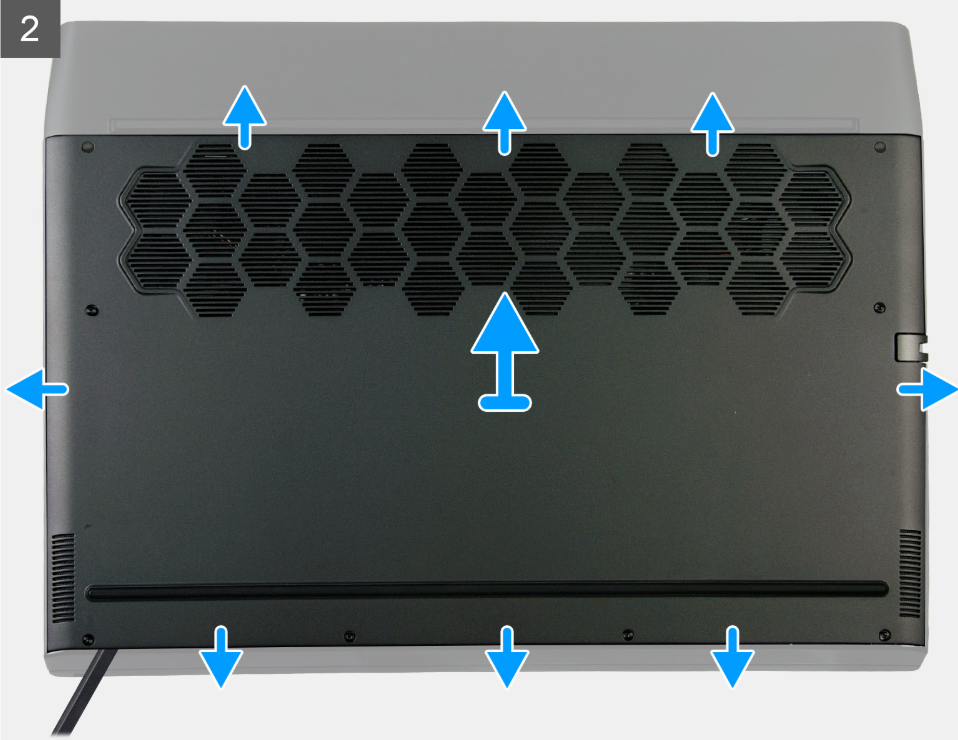
- Remove the two screws (M2.5×5) that secure the base cover to the palm-rest assembly.
- Loosen the six captive screws (they remain attached to the cover).
- Using a plastic scribe, start at the bottom-left corner and carefully release the clips along the edges.
- Lift the base cover away and set it aside.
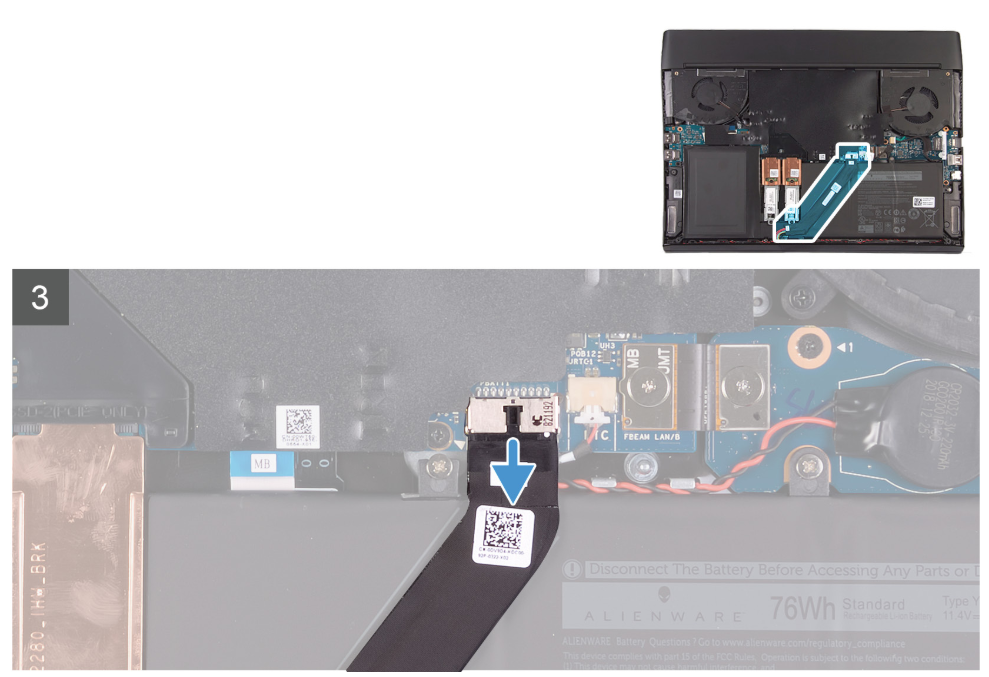
- Disconnect the battery cable from the system board.
- Press & hold the power button for 5 seconds to ground the system and drain flea power.

4) Remove M.2 SSD (If Present)
This model supports up to two M.2 drives. The following applies to systems with an M.2 2230 drive + 2230 bracket.
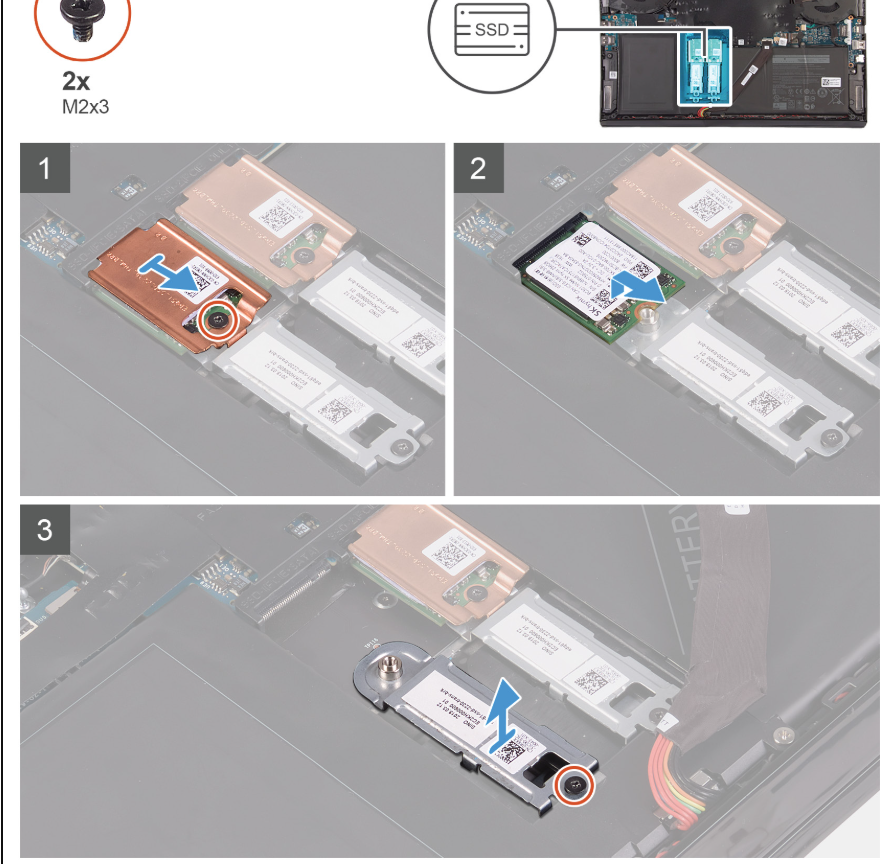
- Remove the M2×3 screw securing the M.2 thermal shield to the bracket.
- Lift off the M.2 2230 thermal shield from the drive.
- Gently lift and remove the M.2 2230 SSD from its slot.
- Remove the M2×3 screw holding the M.2 2230 mounting bracket to the chassis.
- Lift out the M.2 2230 mounting bracket.
5) Remove Old Battery
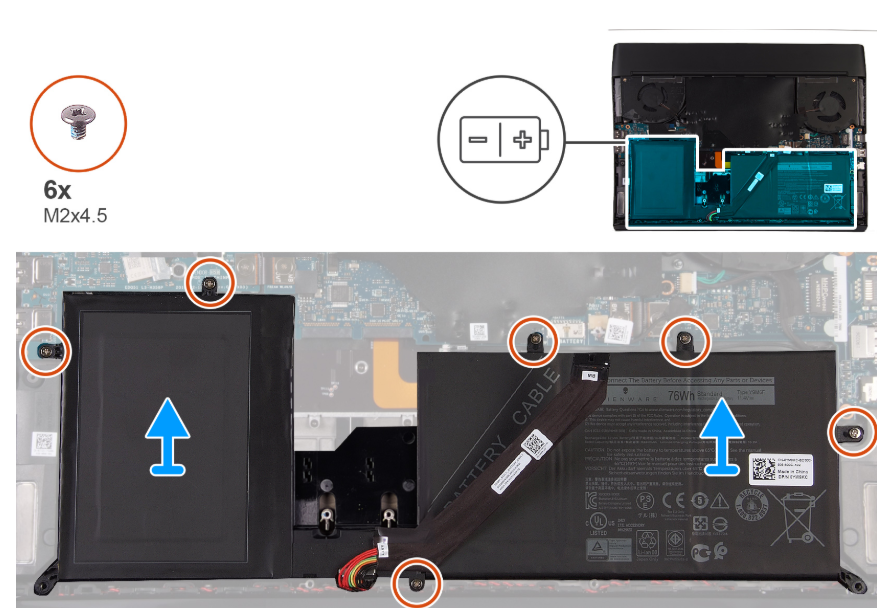
- Verify the battery cable is disconnected from the system board.
- Remove the six screws (M2×4.5) securing the battery to the palm-rest assembly.
- Lift the battery out gently, keeping cables clear.
6) Install New Battery
- Place the new battery into the chassis, aligning tabs and cable path.
- Install the six M2×4.5 screws. Snug them in a cross pattern—do not overtighten.
- Reconnect the battery cable to the system board, seated fully.
- If removed earlier, reinstall the M.2 bracket, SSD, and thermal shield with their M2×3 screws.
- Reinstall the base cover: align, press evenly to engage clips, tighten six captive screws, then install the two M2.5×5 screws.
7) Reassembly, Calibration & Validation
- First boot on AC power. Power on while connected to the adapter.
- BIOS check: Enter BIOS (F2) > Battery Information to confirm the new pack is detected and healthy.
- Windows verification: In Dell Power Manager or Windows, confirm charging behavior.
- Calibrate (optional but recommended):
- Charge to 100%, keep charging for 30–60 minutes.
- Use normally to ~10–20% and then recharge uninterrupted to 100%.
- Generate a fresh battery report:
powercfg /batteryreportand compare Full Charge vs. Design Capacity. - Diagnostics: Run ePSA/SupportAssist (F12 > Diagnostics) to ensure no battery errors.
Alienware M15 R2 Battery Specifications
| Description | Values |
|---|---|
| Type | 6-cell lithium-ion polymer battery |
| Voltage | 11.40 VDC |
| Weight (max) | 0.32 kg (0.71 lb) |
| Dimensions (H × W × D) | 119.31 mm × 311.40 mm × 9.90 mm (4.70 in × 12.26 in × 0.39 in) |
| Operating temperature | 0°C to 70°C (32°F to 158°F) |
| Storage temperature | −20°C to 60°C (−4°F to 140°F) |
| Charging time (approx.) | ~4 hours (computer off). Charging operates from 0°C–50°C (32°F–122°F). |
| Life span (approx.) | ~300 discharge/charge cycles |
| Coin-cell battery | CR2032 (separate from main pack) |
| Operating time | Varies by workload; heavy loads reduce runtime |
Quick Screw & Parts Map
| Assembly | Screw Type / Qty | Notes |
|---|---|---|
| Base Cover | M2.5×5 (×2) + 6 captive | Captive screws stay in the cover |
| M.2 2230 Thermal Shield | M2×3 (×1) | Only on 2230 configuration |
| M.2 2230 Mounting Bracket | M2×3 (×1) | Remove bracket after SSD |
| Battery | M2×4.5 (×6) | Tighten evenly; do not overtighten |
Battery Replacement FAQs
How do I know for sure my battery is bad?
Use the checklist above and confirm with powercfg /batteryreport and Dell Power Manager. Significant wear (>30–40%), charge anomalies, BIOS warnings, or swelling are strong indicators.
Do I need to remove the SSD?
Only if your specific drive/bracket obstructs access. For M.2 2230 with bracket, remove the shield, SSD, then the bracket as shown. For M.2 2280, steps differ and removal may be unnecessary.
How long should I charge after replacement?
With the PC off, about 4 hours to full. Then optionally run one calibration cycle (full charge → discharge to ~10–20% → full charge).
What’s the typical lifespan?
About 300 cycles, depending on usage, heat, and charge behavior. High ambient temperatures and sustained 100% charging accelerate wear.
Is it safe to use the laptop while the case is open?
No. Always reassemble the base cover before use to ensure proper cooling and safety.