Alienware m17 R4 (P45E / P45E002) Battery Replacement — Complete DIY Guide for the 69KF2 86Wh Pack
This customer-first walkthrough helps you identify battery issues, verify with quick tests, and safely replace the 6-cell 86Wh battery in your Alienware m17 R4. Includes photos, specs, and an interactive checklist.
Summary (Jump to Section)
1) Common Signs Your Battery Needs Replacement
2) Battery Problem Diagnosis Checklist ✅
3) Verify the Problem (No Tools Needed)
4) Battery Specs — Alienware m17 R4
5) Tools & Preparation
6) Safety & Data
7) Remove Base Cover (Photos)
8) Remove Old Battery
9) Install New Battery (69KF2 86Wh)
10) First Boot & Calibration
FAQ
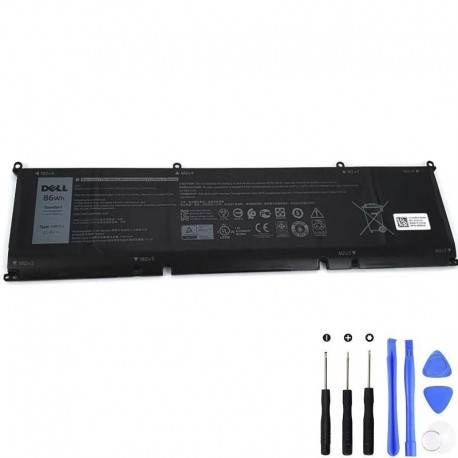
Recommended: 69KF2 86Wh Battery
Compatible with Alienware m17 R4 / P45E / P45E002. High-performance 6-cell lithium-ion pack.
1) Common Signs Your Laptop Battery Needs Replacement
Performance & Runtime
- Battery drains rapidly (e.g., <1–2 hours on light browsing) despite normal settings.
- Wear level > 30% or full charge capacity significantly below design capacity (see verification below).
- Sudden shutdowns at 10–30% remaining; erratic percentage jumps.
- Stuck at a capped charge level (e.g., never exceeds 60–80%) when not using any battery-health limit.
Charging & Health Indicators
- Windows shows “Consider replacing your battery”, “Battery not detected”, or “Plugged in, not charging”.
- BIOS/SupportAssist reports “Battery Health: Poor / Needs Replacement”.
- Adapter and port confirmed good, but charging is inconsistent.
Physical & Safety
- Chassis or touchpad bulging; keyboard feels raised—possible cell swelling (replace immediately).
- Odor of sweet/metallic solvent, unusual heat while charging or idle.
Usage Pattern Triggers
- High gaming loads shorten runtime drastically; after years of use, battery can’t sustain spikes.
- Battery age > 2–3 years with frequent cycles; noticeable decline after heavy gaming/streaming.
2) Battery Problem Diagnosis Checklist
Tick anything you’re experiencing. If 2 or more items are checked, you’ll see a red alert suggesting a replacement.
3) Verify the Problem (No Tools Needed)
Windows Battery Report
- Press Win + X → Windows Terminal (Admin).
- Run: powercfg /batteryreport
- Open the generated battery-report.html and compare Full Charge Capacity vs Design Capacity.
If the wear level (loss vs. design) is high (≈30%+), replacement is recommended.
BIOS / Built-in Diagnostics
- Reboot and tap F2 to enter BIOS → check Battery Health.
- Or run pre-boot diagnostics (SupportAssist/ePSA) to confirm battery status.
If BIOS says Poor/Replace or test fails, the pack is at end-of-life.
4) Battery Specifications — Alienware m17 R4
| Description | Values |
|---|---|
| Battery type | 6-cell 86 Whr smart lithium-ion (Model 69KF2) |
| Battery voltage | 11.40 VDC |
| Dimensions (H × W × D) | 77.70 mm × 295.20 mm × 7.56 mm (3.06″ × 11.62″ × 0.30″) |
| Weight (max) | 0.34 kg (0.75 lb) |
| Operating temp | 0 °C to 60 °C (32 °F to 140 °F) |
| Storage temp | −20 °C to 60 °C (−4 °F to 140 °F) |
| Charging time (approx.) | ~3 hours when the laptop is off |
| Coin-cell battery | Not supported |
5) Tools & Preparation
- Phillips precision screwdriver (size that fits M2/M2.5 screws, typically PH0/PH00)
- Plastic pry tool / spudger (no metal blades)
- ESD wrist strap or regularly touch grounded metal to discharge static
- Small containers for screw sizes: M2.5×9, M2×4, M2×3
6) Safety & Data
- Backup important data before hardware work.
- Swelling? Stop using immediately; do not puncture. Replace the battery as soon as possible.
- Avoid metal tools around the battery and board connectors.
7) Remove the Base Cover
Estimated time: 5–10 minutes • Difficulty: Easy
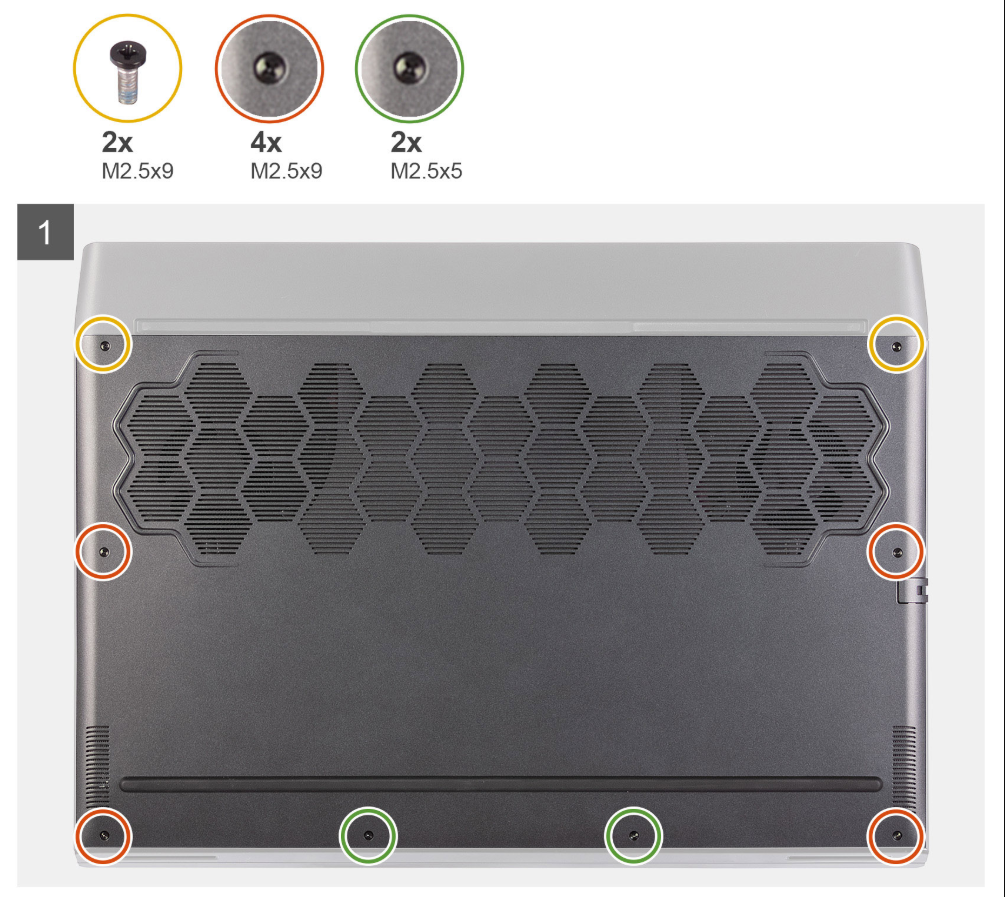
- Remove the two M2.5×9 screws securing the base cover to the palm-rest assembly.
- Loosen the six captive screws (they remain attached to the cover).
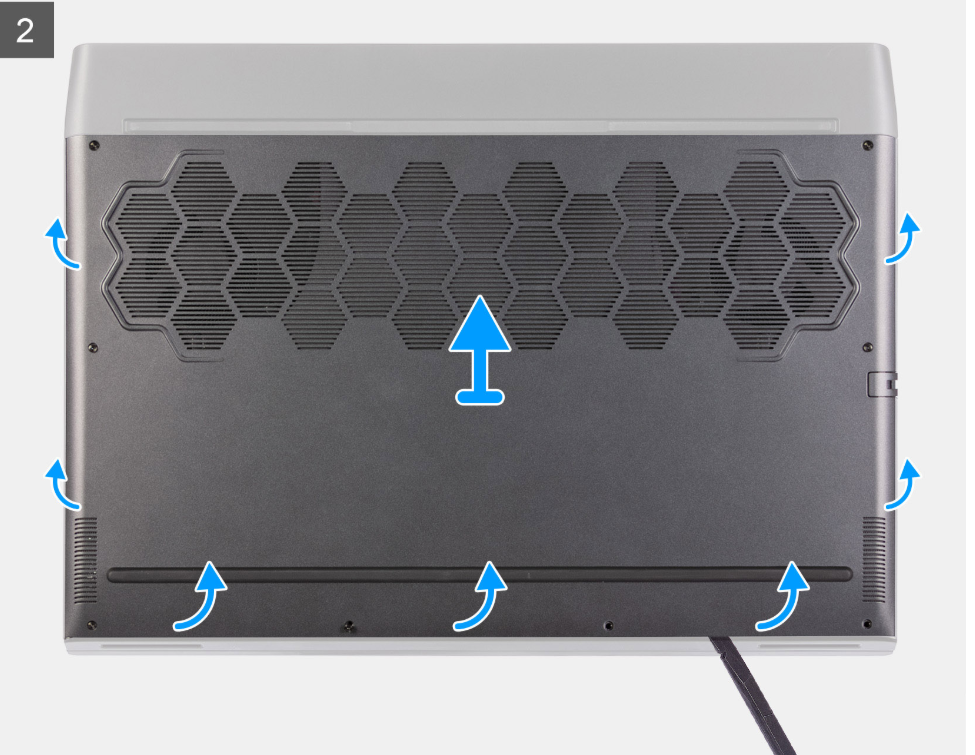
- Using a plastic scribe, pry from the screw-hole gaps to release the clips around the edges.
- Work along both sides to fully disengage the cover, then lift it away.
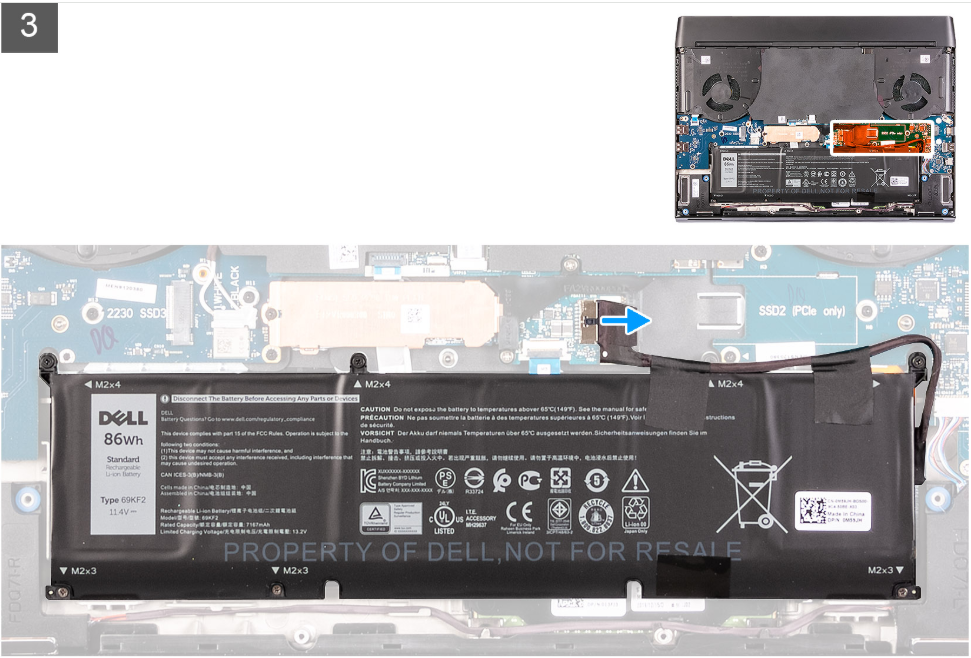
- Disconnect the battery from the system board (you’ll reconnect a new one later).
- Press and hold the power button for ~5 seconds to fully discharge flea power.
8) Remove the Old Battery
Estimated time: 5 minutes • Difficulty: Easy
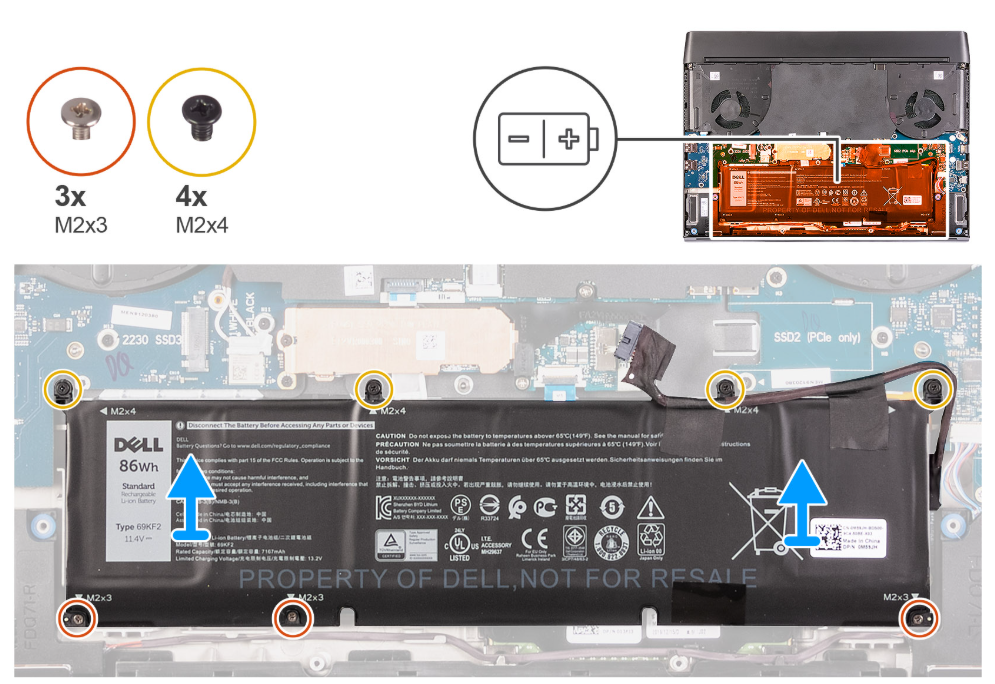
- Ensure the battery cable is disconnected from the system board.
- Remove four M2×4 screws securing the battery.
- Remove three M2×3 screws securing the battery.
- Lift the battery upward slightly and slide it out of the palm-rest assembly.
9) Install the New Battery (69KF2 86Wh)
- Position the new 69KF2 86Wh battery in place. Ensure cables are not trapped beneath the pack.
- Install the three M2×3 screws, then the four M2×4 screws. Do not overtighten.
- Reconnect the battery cable to the system board; ensure a firm, even connection.
- Align the base cover and press along edges to engage the clips.
- Tighten the six captive screws, then reinstall the two M2.5×9 screws.
10) First Boot, BIOS Time & Battery Calibration
- Connect AC power and boot. If you see an Invalid Configuration prompt, enter BIOS and set correct Date/Time. Save & exit.
- In Windows, let the system charge to 100% without interruption, then keep charging for an extra 30 minutes.
- Unplug and discharge to about 10–15% under normal use, then recharge back to 100% to help the gauge learn the new pack.
- Optionally generate a fresh powercfg /batteryreport to confirm the Full Charge Capacity is healthy.
From Symptom → Verification → Decision → Replacement
As a customer, you first notice short runtime, sudden shutdowns, or health warnings. Next, you verify with a quick Windows battery report and BIOS check. If 2+ items in the checklist match your situation, it’s time to replace the pack. With the right tools and the photos above, swapping in the new 69KF2 86Wh battery is straightforward and restores your Alienware m17 R4 to reliable unplugged performance.
FAQ
How long does the replacement take?
About 20–30 minutes for most users, including BIOS time reset and first boot.
Will a new battery improve gaming performance?
It stabilizes power delivery on battery and improves runtime. Peak FPS depends on the GPU/CPU and power profiles, but you’ll avoid sudden drops and shutdowns caused by a failing pack.
Do I need to replace thermal paste or other parts?
No. This guide focuses on the battery only. However, opening the base is a good moment to clean dust from fans and vents.
What if the system still won’t charge?
Test with a known-good AC adapter, inspect the DC-in port, and check BIOS battery health. If issues persist, the charge circuit or board may need professional service.